
 Screenprinting Equipment From Catspit Productions


Screen Printing Articles from Catspit Productions, LLC
Learn How To Screen Print!
Check out the Article Archive for great screen printing articles!
Checklist and Process Overview of Manually Screen Printing Tee Shirts:
Author Bio
There are several steps that need to be completed sequentially in order for you to be able to easily print tee shirts. And in fact many different items may be printed with the standard tee shirt screen. The following is a step by step overview of how the process is done.
First we have to assume that we have all the necessary equipment and supplies to do the job. Therefore this article is not a "how to" style, rather a "what to do". Certain terms and words may be found in the YouTube Glossary section of this website. The glossary should be sufficient to explain what is skimed over here.
 Watch The Video "How To Screen Print: The Process Explained"
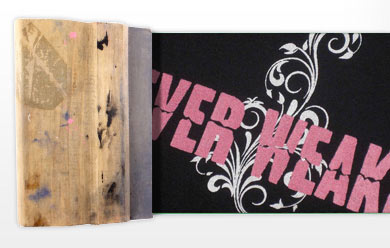
1. Artwork
This is the first and foremost task to accomplish on the agenda. Without art, you have nothing. It is also important to note that setting up art for screen printing is different than that of other types of printing. Your art is critical. It needs to be set up properly for screen printing so that it may print easily and look great. Make sure your artwork is right before you go to screen. It is wise to spend as much time as is needed to get it done correctly. Check the favorites list on our YouTube channel for tutorial videos on creating art.
There are many different ways of generating artwork from simply hand drawing it to using sophisticated computer software to create it. Artwork should be created specifically for the product it will be printed on. If the material is course and has texture, fine lines will not reproduce well. The bottom line is you need to know what you're doing here. If you're not sure do some research. The ultimate goal is to create a film positive of your art. This is simply a positive rendition of your art in black on a clear based transparent film. It could be anything from vellum to overhead transparencies. The most important thing of all when making your film is making sure it is dense enough. If the film is not 100% black in the artwork areas, then light will pass through it semi curing your emulsion which will cause it to be very difficult to wash out, if at all. The better your film is, the better your stencil will be on the screen and the easier it will be to make the screen.
 In general there are four types of artwork for screen printing. Spot color artwork and four color process artwork. You can also have a one color halftone artwork. Combined halftones with spot color art are sometimes referred to as spot and dot.
Spot colors tend to have large open areas as well as lines in the stencil where the ink will pass. There are no dots or line screens.
Four color process is the recreation of a full color image using halftones for each of cyan, magenta, yellow, and black inks. Instead of open areas where the ink will pass, there are areas of various size dots. The density and size of the dots determines the percentage of ink printed. This uses four screens to recreate a wide array of colors in a full color print.
One color halftones can reproduce a percentage or intensity of a single color of ink. This is like the art used in four color process but only printing an image in one color like a black and white newspaper print. If a spot color print of a red circle prints a solid red circle on a white tee, then a 50% halftone of a red circle will look like a pink or light red circle on a white tee.
A spot and dot combines one color halftone art with spot color art.
Remember, for every color you wish to print, you will need a separate screen. Multi color artwork is separated into different "printers". If your design has three colors, there will be three pieces of film and three screens made from them. Each screen will print a different part of the design in its respective color. We will proceed from here as though we are only doing a one color. Repeat the process for multiple colors with each piece of film for your design.
Once you have created your art and output it to a film positive, you will be ready to prepare your screen to receive the image you just created on the film
Videos:
Artwork
Making Film Positives At Home
Film Positive Tips
2. Choosing The Frame And Mesh
You can make a decent commercial grade screen yourself with the appropriate equipment and/or tools as well as professional grade supplies or you can buy a screen premade with mesh already stretched on it ready to go. Wood frames can be good if they are made well and sealed with lacquers. But wood frames age quickly and lose their rigidity especially when they are used and reclaimed on a regular basis. Metal screens work best if you plan on reusing the same screen for many different jobs as they need to be printed.
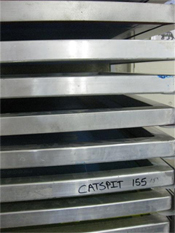
Standard textile screens are made with rectangular metal tubing having outer dimensions of 20 X 24. They come in many sizes and materials but I have found the 20 X 24 aluminum frames to be the best for tee shirt printing on a rotary textile press. You can purchase screens pre-stretched with mesh. They are economical in the consistency of the quality of the frame and tension. It is very important to have a rigid squared frame with tight mesh firmly secured to it. The performance of your screen and stencil will depend on the quality of the frame and screen itself. The better the screen performs, the easier it is to print a higher quality print. The easier you can print a high quality print, the more money you can make per hour.
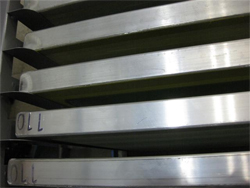
 At this point it is wise to choose the appropriate mesh for the artwork. A common tee shirt mesh count is 110 but it is not the default mesh for textile printing. Mesh count numbers work in reverse. The bigger the number, the smaller the openings will be in the mesh. The smaller the number, the bigger the openings will be in the mesh. 355 mesh is standard for printing four color process. Obviously the bigger the mesh opening, the more ink will easily pass through the mesh onto the shirt.
Standard spot color line art works well on 110 mesh. If there are fine lines and some detail in line work a 205 mesh may suffice. Process halftones with 40 to 55 dpi will work best on a 305 or 355 mesh. A lesser line count like 36 to 40 dpi for a 1 color halftone should work on a 230 mesh. These are by no means any real guide to setting up halftone screens. There are formulas and ways to determine the halftone line angle. Your halftone will be specifically made for your mesh count. Halftones can be tricky to print and need to be set up to avoid Moir� patterns with the mesh itself. Make sure you do your research on this before attempting to do it yourself.
Videos:
Tips On Good Ink Coverage
Wood Vs. Metal Frames & The Tension Meter
Screen Mesh Tips
3. Prepping The Screen For Emulsion
Once you have chosen your frame and mesh and have your screen finished, you will be ready to prep the screen to coat with emulsion. This is a very simple step and only requires that you gently abrade the surface of the mesh with a mild abrasive while cleaning the mesh of any residual grease or dirt. This is normally done in a washout booth where the screen can be easily soaped up with "mesh prep" and thoroughly rinsed off. Now you would let them dry off completely in a dust free environment. This ensures that when the screen is dry it is clean enough to receive the emulsion without complications.
Videos:
Preparing The Screen For Emulsion Expanded
4. Coating The Screen With Emulsion
Now the screen is ready to coat with emulsion. Emulsion is a light sensitive liquid chemical that is applied to the screen; it becomes most light sensitive when dry. For this step the best tool is a scoop coater even if you are the home printer. This is a tool devised to be used by hand that resembles a trough the width of the screen with a rounded smooth edge or "blade" on one side. Typically a scoop coater for a 20 X 24 screen is about 14 inches wide so that you may coat a screen length wise with one pass from bottom to top. It will give you the most consistent, smooth coat and provide even thickness in the emulsion as well. The thickness of your stencil is directly related to the amount of ink that will be deposited onto the shirt. The thicker the emulsion is, the deeper the stencil is and more room the ink will have to be deposited onto the shirt. This gives better "opacity" or "coverage".
The side of the screen that comes in contact with the tee shirt is known as the substrate side. The side where the ink is placed and pushed through the screen with the squeegee is known as the ink well side. You will want the thickness of the stencil to be apparent on the substrate side. This is accomplished by how you coat and dry the emulsion on the screen.
Coating your screens with emulsion should be done in subdued yellow or red light. This part of the process is often done in a "dark room" or an "exposing room" where the exposure table is also located. This is very handy as when the screens are dry, they will need to be handled in the same lighting conditions to place artwork on prior to exposure.
 In order to deposit a thicker layer of emulsion on the substrate side, you will need to coat the substrate side first. Always make coating passes length wise starting at the bottom. Then follow with a second or third coat from the ink well side of the screen. This will push much of the emulsion to the substrate side and it should look very glossy with a wet sheen. Now we dry the screen in a level rack with the substrate side facing down. This will allow gravity to keep the emulsion thickest on the substrate side. Make sure the drying rack is either light safe or in a light safe room, level, and has sufficient air circulation. Poor air circulation will result indimpled emulsion and an unusable screen.
Depending on how good your air circulation is and how many screens you coat at one time, your drying time can be anywhere from an hour for one screen to overnight for a rack full. The drying time will also depend on the relative humidity in your geographic region. Remember that the area where the screens are drying with emulsion should be a clean room with minimal dust being airborne. Dust that falls onto the surface of the wet emulsion on the screen is most likely to cause pinholes or blockage within your stencil area.
Once the screen is dry it is very light sensitive and all steps hereafter up until the screen is taken out of the exposure unit should be done in subdued yellow or red light.
Videos:
Prepping And Coating Screens
Emulsion Scoop Coater Tips
5. Placing Artwork on The Screen For Exposure
 This should be done in subdued yellow or red light. For a one color design placing the film positive on the screen for exposure is quite simple. We will place it on the substrate side with the film facing up so that when you look at it from the ink well side the design will "read right". Just center the design from left to right and set it down about 3 or 4 inches from the top. The top would be the side that is closest to you when mounted in the press. Use clear Scotch Tape to hold the film in place on the emulsion coated screen. It is often helpful to make a "dog ear" on the tape for easy removal after being exposed and before washing out.
For artwork with multiple colors and thus multiple film positives, you will need to place each film positive so that the registration marks for each film positive fall in the exact same place on each screen. Exact may be a severe term but there should be no more than 1/8 of an inch of variance between the location of each color film positive on the screen. Having your design lined up correspondently with each film positive to the screens will prevent time consuming re-burns and/or work-a-rounds. There are "carrier" systems that will make it very easy to set up multi color designs on your screens with great consistency and speed. If you plan on making a lot of screens on a daily basis, a carrier system is a wise investment.
Videos:
Placing Your Film On The Screen
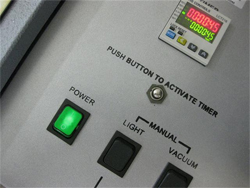
6. Exposing The Screen
Now that the art is taped to the screen in the appropriate place, we are ready to place it in the exposure unit and expose the emulsion to light. This is the step in which we cure the emulsion with light. Remember that your film positive will be 100% black for the areas that will print ink. The black areas on the film positive that make up your design will block the light from hitting and exposing the emulsion. Those unexposed areas of your design will remain water soluble while the rest of the emulsion on the screen, being exposed to light, will be cured and thus no longer water soluble. This means that the emulsion that was blocked from the light by your film positive will dissolve and wash out when rinsed with water.
Simply place the screen in the exposure unit with the substrate side down, (with film attached), coming in contact with the glass. Close the rubber blanket top and turn on the vacuum. Allow the machine to completely finish the vacuum cycle to ensure the film is sandwiched between the glass and screen tightly. Now set the timer to the pre determined setting and expose.
Your exposure time will depend on three factors. The exposure unit or light source, the emulsion, and the mesh being used. The vendor of the emulsion should be able to provide a starting point for you based on your criteria.
 There are many different emulsions available on the market today. I work with a pre-sensitized emulsion that has a very good shelf life. Other emulsions have to be mixed with a sensitizer or catalyst and may not have such a good shelf life. You may need to do research on the emulsion that will be appropriate for your application. A standard pre-sensitized textile emulsion will hold up to solvents and plastisol inks very well. Remember, printing tee shirts is not rocket science. Most any high quality textile photo emulsion should suffice.
When the timer stops and the light has gone off, turn off the vacuum and remove the screen from the exposure unit. Take off all of the film and tape.
Exposure units come in various sizes and this will limit your ability to do oversized work if you buy a very small unit. For instance, my exposure unit is only big enough to expose 20 X 24 frames maximum outer dimensions. If I wanted to take on printing signs, I may not be able to produce the size screens needed. So your exposure unit is one piece of equipment that you should purchase with your business goals in mind.
Videos:
Getting Your Art To Screen
Screen Exposure Tips For The Home Printer
Safelights For Screen Making
7. Washing Out The Stencil
 Quickly take your screen to your washout booth and immediately wet both sides. Once the screen is wet it is relatively safe in regular light. Wet, uncured emulsion will be less reactive to light at this point. Gently rinse the screen on both sides with standard garden hose pressure from a hand trigger spray nozzle. Be very gentle on the ink well side. This side is always slightly under cured and may look different in color and appear slimy or sudsy. This is normal. After gently rinsing both sides of the screen for about a minute or so turn the screen so that the substrate side faces you and let stand for a minute. Now focus on spraying the water directly at and through the image areas of your design.
As soon as you wet the screen you will see a "latent" image of your design begin to emerge in the emulsion. Do not force it, be gentle. The emulsion should start to look lighter and thinner, eventually washing out. You should be able to see this happen and watch closely as you only want to spend the amount of time washing the screen out as is necessary to get the uncured emulsion out of the mesh. Once you can see that your entire stencil area is free of uncured emulsion, go to a wide, sheeting spray action with the water. Rinse both sides with a flooding, sheeting action running down the screen. This will help remove any scum left behind from the slightly under cured emulsion on the ink well side.
At this point it is helpful to use a very low pressure air hose to gently blow out the water and any remaining scum out of the open mesh area which is now your stencil. The emulsion is still very wet and delicate so be extremely careful not to use too much air pressure as this may blow away parts of the emulsion resulting in stencil damage. Avoid touching the emulsion and/or allowing any debris to come in contact with it. Allow the screen to completely dry out. The emulsion should be thoroughly dry. The drying time will depend on the relative humidity in your geographic region.
Videos:
Washing Out The Stencil & Reclaiming
8. Checking For Pinholes
 Simply place the finished screen on a light table or hold it up against daylight and look for any unwanted holes or breaks in the emulsion due to dust or foreign debris. It is best to use a light table so that you may see what you are about to do. We will want to fill any pinholes or other mistakes with block out. Block out is an emulsion like chemical you can use to fill pinholes. It is not light sensitive and only needs to dry. Be sure it is compatible with your solvents and inks.
You can use some of the emulsion used to make the screen or old emulsion as block out. You can keep a small container of it so that you are able to take it out and work in daylight using it as needed. If you use photo emulsion to block out pinholes or any portion of your screen, you will need to do a post cure. You can use anything from the tip of a pencil to small fine art brushes and small plastic smoothers/scrapers to apply block out. It is most often applied to the substrate side but it is a good idea to make sure it is filled on both sides but remaining relatively flat. Don't create bumps or dimples by leaving large drops of emulsion to fill pinholes. Keep it smooth.
9. Post Cure
Many screen printers employ a technique known as the post cure. This is often done whether or not a photo emulsion was used as block out. In general, this is done to ensure that the ink well side of the screen is fully cured. The screen is simply put back on the exposure unit, this time with the ink well side facing down toward the light source, and exposed again. The top is pulled down but the vacuum is not necessary for this. We are just making sure all of the emulsion is fully cured and hard. Dual cure emulsions may not respond to post cures.
Now the screen is ready to tape off and go to press.
10. Taping Off The Screen For Printing
Tape off any areas on the sides of the emulsion toward the frame edge where there may be no emulsion present. Typically a scoop coater for a 20 X 24 screen is about 14 inches wide. This will leave about 2 inches or less of open mesh on the length sides near the frame edge. Make sure to tape off all 4 sides to ensure that stray ink will not pass through unwanted areas of open mesh. Some screen printers prefer to do this with block out. I find using masking tape or screen tape is best and costs less. You can tape off the edges of a screen on either side. It is your preference. I tape off my screens on the substrate side because I work in such a way with my ink that tape on the ink well side gets in my way. This is because I prefer to use the more controlled, efficient, and ergonomic pull flood and push stroke.
 Standard 2 inch masking tape will suffice for most of your taping needs on press. Screen tape is often good to use to tape off the screen so that it tolerates more solvents. Masking tape will become more difficult to remove with more exposure to inks and solvents. 2 inch screen tape will remain very easy to remove without leaving a ton of adhesive on the screen that will need to be cleaned off during the reclamation process, if that is where the screen will end up. Point being, that sometimes spending a little more on screen tape and using it wisely, (just to tape off the edges), can save you time and labor later.
If you have multiple designs on one screen, you will want to obviously cover the designs you are not printing while you print another. If the stencil is not inked, I will tape it off on the ink well side so that it stays clean and I can easily line it up on the pallet for use next. If it something that has already been printed, tape it off on the substrate side to cover the ink already in the stencil. I use pieces of glossy magazine paper with masking tape. Just tear a piece of the glossy magazine paper to fit the design and tape down with masking tape to prevent unwanted ink passage. The longer you leave this on the screen the more difficult it may be to remove and clean out the mesh in the design you have covered during a print run. This is especially true if the area gets ink soaked and ink passes to the magazine paper. It will get oily looking but it will not leave ink on the shirts. It will clog the screen if left for long periods of time but it is possible to clear it out with screen opener.
Videos:
Screen Taping Tips
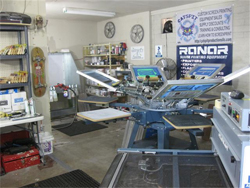
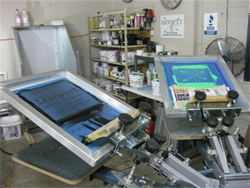
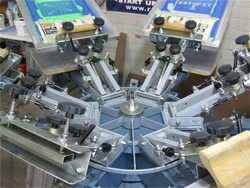
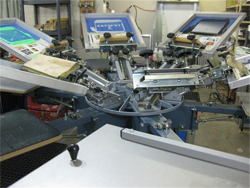
11. Going To Press
Now you are ready to go to press. We will assume that you are versed in the printing of a one color design; inking up the screen and flooding and stroking ink through the stencil onto the shirt with a squeegee. We will compare printing techniques later. For this part you will also need an understanding of how your particular press works. Get familiar with your press. Become friends with it. Name it, give it love for this machine you will be married to in a commercial business. The press can be your best friend and your worst enemy. Make sure your press is in good working order. Skimping on press maintenance and buying used equipment that is no longer in good shape is unwise. The better your press is, the easier it will be to print high quality prints quickly.
In order to mount the screen in the print head with ease you can draw cross hairs on your pallet. If your pallet is somewhat clean and the cross hair lines are dark, you will be able to see them through most emulsions before they are inked up. After the screen has been inked up and used a bit, it may be difficult to see your cross hairs on the pallet. Take the time to line up your screen properly before you ink it up.
For multi color prints go from the most amount of information and the darkest color first to the lightest color with the least amount of design on the screen. I draw a cross hair on my master pallet and line up my black printer to that first. I always line up my black printer first, the one with the most information, then line all other colors up to that. Take some time to do this before inking up so you can get it as close as possible.
When you make a cross hair use a medium tip black Sharpie and make the lines bold so you can see them through the emulsion on a new screen. Your pallet will have to be somewhat clean so you may see the black lines easily. You shouldn't let too much shirt felt and spray tack build up on the pallet anyway. A clean, smooth pallet will give better results especially with halftones. Square the lines off with the edges using a right angle drafting tool. It's nice when it hangs off the pallet on one side of the square so you can do it pretty quick by putting it flush to one edge and make sure the ruler guide is long enough to cross the pallet at least from shoulder to shoulder.
 I make a center line and several cross hairs at different levels so I can line them up with different parts of the design on the screen. To make your center line go all the way from end to end, measure the center with a ruler and make marks down the length. Then use a long straight edge you can "connect the dots" sort to speak. You can also make a "center line" to the left of the actual center line to get your crest prints, (over the heart), set up too. The position of that line may depend on where your shop likes to position that print. This is most useful when setting up the first screen. It makes it easy to get the design as a whole centered and lined up. Print a test print on a rag shirt on the pallet and then setting up the other screens after that you will use the registration marks on the test print on the pallet. I think the most important thing is to get to know the press. Sometimes presses can have certain characteristics and knowing them is your best tool to speed up your set up time. When I say that, it can mean simply from press to press of the same make or even presses of different brands. So, ultimately, experience will get you moving faster.
Take the time to make sure you have all your screens registered as close as you can get before inking them up. When you are happy with the "dry" registration set up, ink up all your screens and do a test print and make adjustments using the micro registration on your press. You will also need to make sure the off contact settings on the press are sufficient.
There are literally thousands of textile rotary press configurations and it is important to figure out what you will need in this area. This is probably the single most critical decision in buying screen printing equipment. Make sure you buy something that you can grow your business with for some time. It would be silly to spend a lot of money but not quite enough on a press that only meets your need s now. This will limit your ability to take jobs and earn more money as you grow. Not being able to do certain jobs because of your equipment can be frustrating.
Videos:
The Shirt Press
2 Color Print Demo With Flash
3 Color Print Demo With Flash
Setting Up On The Press
Loading The Pallet With Shirts
Squeegee Tips
1 Color T Shirt Print Run Demo
Unclogging Screens On Press
13. Curing Ink On Printed Shirts
Plastisol ink is a type of ink used for screen printing textiles. Plastisol inks are the most commonly used inks for printing designs on to garments, and are particularly useful for printing opaque graphics onto dark fabrics. Plastisol inks are not water-soluble. Because the ink is made up of PVC particles suspended in a plasticizing emulsion, the ink will not dry if left for extended periods of time. Plastisol inks are recommended for printing on colored fabric and on lighter fabric; plastisol is extremely opaque and can retain a bright image for many years. Plastisol inks will not dry, and need to be cured as a result. Curing the inks can be done with a flash dryer, or a belt oven. Most plastisol inks need to reach a temperature of about 330 degrees Fahrenheit before being fully cured. Plastisol tends to sit on top of the threads instead of soaking into them, giving the print a raised, plasticized texture. When printed through higher mesh counts, plastisol inks can produce a softer feel.
With that being said, remove your shirt from the press and run through a tee shirt belt oven making sure it reaches optimum temperature by the time it emerges from the exit point and falls into a catch box.
Under cured ink can wash out and over cured ink can prematurely flake off and crack. For about $30 to $40 you can buy a temp gun with a laser sight. Point the laser sight at the ink on the shirt as it is still 4 to 6 inches still inside the oven chamber and take a reading. It should have reached your optimum temperature for your brand of ink, typically between 320 to 340 degrees Fahrenheit. Check with your ink vendor on this.
There are many belt dryers on the market today. Make sure not to over purchase or under buy your dryer. Belt dryers have certain maximum rates at which they can run shirts through the chamber and reach optimum temperature. A dryer made for manual printing will not be able to keep up with an automatic press and you certainly do not need a dryer rated for an automatic press unless you plan on going automatic one day. So your dryer is yet another piece of equipment that you should purchase with your business goals in mind.
Videos:
The Tee Shirt Oven
The Flash Cure Unit & Options For Home
Reclaiming Screens
This part of the process is done when we need to reuse the screen for another job. The chemical needed is called "reclaimer" or stencil remover. It most likely will need to be diluted but there are some that you buy ready to use. It is most often put in a chemical resistant spray bottle and kept with other chemicals in your washout booth.
After you have finished printing a job, clean the screen of any ink and all tape. Put it in the washout booth and spray both sides of the screen with the stencil remover. Let stand for a minute or so and begin to rinse with a pressure washer. You shouldn't need a ton of pressure but it is a good idea to have a halfway decent one. Make sure to follow the directions for your specific stencil remover.
The emulsion should begin to dissolve and wash away with the spray from the pressure washer.
Give the screen a thorough cleaning making sure all residual emulsion is removed. I like to make sure the entire screen is very clean at this point. Check for any ink that may have been missed and stray emulsion bits and pieces on the frame itself. Rinse well.
Videos:
Washing Out The Stencil & Reclaiming
Reclaiming & De-Hazing Expanded
De-Hazing
Sometimes the ink you have printed through the screen will stain the mesh. When the stains become bad, you will want to remove them for various reasons. Hazing can cause ink flow problems and even emulsion adhesion complications.
The chemical needed to do this is called haze remover or de-hazer. This comes in different types of products. Some are spray-able and others are a paste or gel like and need to be swabbed onto the screen with a brush. Most will need to sit for a few minutes before rinsing out with the pressure washer.
After removing the stencil and rinsing well, apply some of your haze remover in the manner described by the vendor. Follow the specific instructions for your haze remover and rinse well with your pressure washer. Allow the screen to dry. Now you are ready to start the whole process over again.
Haze removers are probably the most hazardous chemicals to work with in screen printing. There are many new products that are more user and environment friendly. Do some research to find the best chemicals for your usage.
Videos:
Reclaiming & De-Hazing Expanded